The focus of this discussion as the title implies is how to handle authentication and authorization (the latter to a certain degree) on Cisco IOS devices with Active Directory. On an IP Base IOS image we basically have two choices for this task – RADIUS and TACACS (and of course the local database). The latter is capable of connecting to Active Directory, although certainly not easily. There are situations where a TACACS system is necessary (such as command level authorization). Microsoft includes a RADIUS server in Windows 2003 (and 2000) called Internet Authentication Service (“IAS”). The interface for IAS isn’t the simplest GUI, so it may take some tinkering to get everything right. The rest of this discusion outlines the steps I took to get IOS logging in to AD.
The first step is to get IAS installed and registered in Active Directory. Microsoft recommends that IAS be loaded on domain controllers (and ideally global catalogs) for performance reasons. In a low load environment this is less important, but, this is the route I took. The referenced link outlines other performance optimization tips for IAS deployments which should be considered depending on the deployment design. Another caveat which is fine print at the bottom of that link is that Windows Server 2003 Standard Edition only supports fifty RADIUS clients. Enterprise edition is required for more than fifty clients. A general best practice of course is to have at least two IAS servers so that in the event of a failure clients can continue to be authenticated. Cisco devices will of course fallback to a local logon, but this is a less than ideal situation, especially in an organization with a large number of administrators. IAS is listed under Networking Services in Add/Remove Programs>Windows Components. Once IAS is installed, open the IAS console (Start>Programs>Administrative Tools>Internet Authentication Service), and right click the root node of the tree and choose “Register Server in Active Directory”. This will add the computer account to the RAS and IAS Servers group in Active Directory. This group grants the computer the necessary rights to read the dial-in properties of user objects. IAS will also inform us that to authenticate users from other domains we must add the IAS server’s computer account to that domain’s RAS and IAS Servers group manually.
At this point we can define our authorization structure. For the purpose of this discussion, I’m going to define authorization as sufficient access to login to the device. The enable password is still required and stored in the device’s local configuration. I’m going to use Active Directory universal groups to define this authorization structure here. I like to name devices on a network based on their location using a location-device### format, so, we’re going to assume we have two locations, a central office (“CO”) and a branch (“Branch1”). We’ll need two groups in AD, “CO Network Device Access” and “Branch1 Network Device Access” which will be utilized to generate the remote access policies in IAS.
In IAS, we need to create two remote access policies – one for access to CO devices and one for access to Branch1 devices. To do this, create a new RAS Policy, and call it “CO Devices”. Choose “Set up a custom policy” as well. Our policy will key off of the host name of the device and check the group membership of the user. First add a condition for “Client-Friendly-Name”, and specify “CO-*” as the sole parameter. Add a second parameter “Windows-Groups” and search for CO Network device Access.What we’ve accomplished here is created a policy which requires the device’s hostname to start with “CO-” and the user to be a member of “CO Network Device Access”. On the next page choose to “Grant Remote Access Permission”. On the next page choose the edit profile option, and on the authentication tab select the second to last checkbox “Unencrypted authentication (PAP, SPAP)”. Note, fortunately we will be able to provide a shared secret so the password will not be sent in plaintext. Cisco added MS-CHAP v2 support for PPP authentication in a recent 12.4T release, so I’m hopeful this will show up for line authentication sometime soon. Repeat this procedure for Branch1, substituting Branch1 for CO where appropriate. The IAS console should look something like this after this step: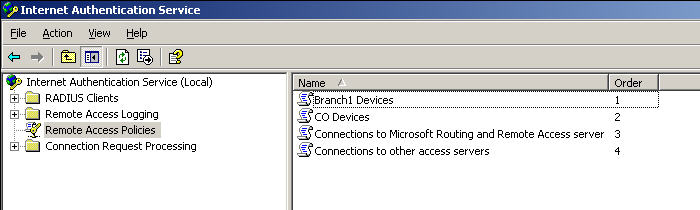
Now that we have policies which define who is authorized to authenticate, we can setup devices in the IAS console. To do this, create a new RADIUS Client. The “Friendly name” should be the same as the hostname of the device (this is actually what our policies are keying off of, so if you have a complex requirement you may want to steer away from this design). The client address is the IP address of the interface on the device sourcing authentication requests. On a device with multiple interfaces, the interface sourcing RADIUS requests can be specified in the configuration of the device. On the next page, select Cisco from the “Client-Vendor” dropdown, and specify a shared secret. I’m using “Ci$ko” for this example. Repeat these steps as necessary for all of your devices.

At this point if you have multiple IAS servers (which you should), netsh can be used to export the IAS configuration and import it on the other IAS server(s). IAS does not store its’ data in Active Directory or any other replicated database. To export the configuration to a file run this command: “netsh aaaa show config >iasconfig.txt”. To import the configuration on another server, run “netsh exec iasconfig.txt”.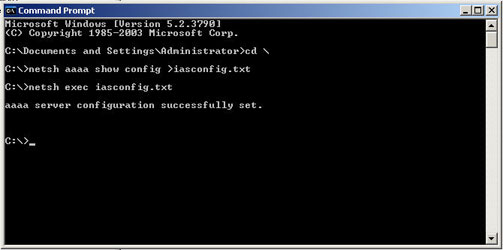
The IOS side of the configuration is quite easy. The commands can be entered sequentially either as a paste in from a text file or as part of some automated procedure (e.g. SecureCRT scripts, an Expect shell script, etc). The sample config below assumes two IAS servers with IP addresses 192.168.1.10 and 192.168.1.11. The sample also sources all requests from interface Loopback0:
conf t
aaa new-model
radius-server host 192.168.1.10 auth-port 1812 acct-port 1813 key Cis$ko
radius-server host 192.168.1.11 auth-port 1812 acct-port 1813 key Cis$ko
ip radius source-interface Loopback0
aaa group server radius RadiusServers
server 192.168.1.10 auth-port 1812 acct-port 1813
server 192.168.1.11 auth-port 1812 acct-port 1813
exit
aaa authentication login default group RadiusServers local
exit
Assuming the password-encryption service is started on the device the shared secrets will be encrypted after they’re entered. It is also highly recommended that a local login exist in case there is a failure to communicate with the RADIUS servers for any reason (the authentication order in the configlet specifies falling back to the local database after the RadiusServers group). Ports 1812 and 1813 are specified in this configuration, so the necessary holes will need to be punched through firewalls and access-lists to allow this to work. To change the ports utilized by IAS, pull up the properties of the root node in the console and choose the ports tab.

This is all the configuration which is required to set this up. IAS logs to the System event log on the server hosting IAS and is fairly chatty. All successful and failed logons will be logged as information and warning events, respectively. On the IOS side, “debug aaa authentication” and “debug radius authentication” are both very useful troubleshooting tools. Ethereal is of course an invaluable tool for troubleshooting this process – it includes a PAP protocol module.
I’ve outlined a simple configuration for connecting IOS devices to Active Directory by way of Windows 2003 Internet Authentication Service using the RADIUS protocol. There are several opportunities for enhancement here including more in depth authorization, and accounting. Setting up wireless access points to integrate with Active Directory using machine and/or user accounts is another use of this setup.